Showing posts with label step by step demo. Show all posts

Saturday, November 29, 2008

"Peregrine Falcon" watercolor

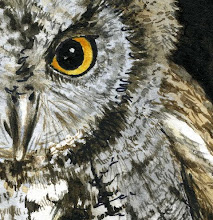
This is a watercolor study I did to as a demonstration for my fall Nature Sketching and Painting Indoor class that just finished up. I used it to show the stages it took to make a simple study, step by step, layering washes, values etc. Posted below are the steps it took to make this 5"x5" study head, be sure to click on pictures to see larger views! Enjoy!

Detailed sketch - Shown below, first I started with a light gesture sketch of the shape of the bird, then rechecked placements of things and refined details.
Darkest Darks-This is one approach to watercolors, start by laying in your darkest darks and blacks. If you start with a confident sketch it should work out fine, when you work this way you set out from the beginning with a defined dark end of the value range. You can then judge all other values against it as you paint. You won't have to go back and keep "pushing" your darks to make them pop.
I also painted the eye, being carful not to touch the highlight area, black for the pupil, and brown put into the wet black for the iris. (I think I put my reading glasses on for this step! haha).

Below I started to lay in more darks of the cheek, as my brush was drying out I would 'sketch' areas I wasn't sure about...just to start to lay in some value so I could see where I wanted to paint. Color Wash-Here I laid in a bluish grey, ultramarine and black thinned with water. After it dried I laid in some small lines for feathers.
Changeing the drawing- A pale yellow ochre wash on skin of eye area and nares. A wash over the eye highlight to tone it down and soften it. Here I also made a decision about the beak, now that I was putting values down, I thought the beak looked a bit too heavy. So before committing to paint, I erased! I reworked the curve then I painted keeping all areas soft and blended slightly.
Feather details-I brushed on more feather details here, laid in more darks with repeated 'feather' strokes to top of head and all around eye. Nice spotty look at right edge, I like when the watercolor can been seen for what it is, it gives it a looseness. See the photo below for this step, just repeated tiny strokes.
Yellow of beak and eye-Here I laid in the yellow on the nares and eye area, and it's completed!

Please visit my shop to see it on many items, including prints, glossy note cards, t-shirts, sweatshirts, hoodies, ceramic tiles, postage stamps, mugs...there's so much! You'll also see my other birds of prey paintings there! http://www.zazzle.com/marymcandrew/gifts?cg=196549703362479635

Thursday, February 21, 2008

"Cooper's Hawk" 2-21-08


I was inspired on Tuesday (19th) to paint a Cooper's Hawk when I saw one (or a Sharp Shinned Hawk) swoop over my bird feeder. I talked about it in my post on the 19th. So I did this small study from a field guide in my 5"x81/2 " sketchbook. First I did a "Gesture Sketch" then added some details when I felt the drawing was correct.
I started first with black watercolor in various values to 'draw' more details in, feather markings, wing values and shape. Then I dabbled on with my fine pointed round brush, a light value of breast color. While it was wet I sprinkled on salt to see if it would help break it up, in a random way, I love the way salt does this. I also put in an orange red for the iris of his eye.

In the third picture I have laid on more breast value, defining more of the 3d shape of the hawk's breast and body. I put a pale wash of purply pink under his tail and touched it to his wing feathers and by his eye. I put a tiny bit of blue on the beak and behind the eye to shape his head more. I also colored the branch, legs and put some browns up onto wing feathers.

The fourth picture I added some more colors here and there on the hawk, more color on the grey wing feathers and around eye. If you notice the longest tail feather in the last picture I rubbed out in this one. If you need to change something, wet it and repeatedly brush it and dab with a papertowel. I wanted to shorted in because it was making the whole tail look too rounded. I used my favorite little Chinese brush to make the pine needles in the background. I have a picture below about this.
The final picture of my painting shows another little Cooper's Hawk study, this one done with Inktense watercolor pencils, Prismacolor watercolor pencils and one Graphitint water soluble pencil. You can see the difference between the transparent watercolor painting and the wc pencil painting. I like the grainy look of the wc pencils, it has a softness to it. On my sketchbook I've listed the actual colors for those who like to know! You can click any picture to see it larger.


This photo shows how I used a plastic bag to block the birds breast so I could brush right from his breast out, without getting him green! It's a little trick you can do to protect your areas you've painted. I would be holding it down with my fingers normally, but I had to hold the camera! (I need a camera man!) Then I show how I use my little Chinese brush by splaying it out, to make pine needles, it works great! The next photo shows me putting the needles on with the brush tips.
Now here's a little tip that I just put to good use, you can see in the last photo I have two pencils in my hand. You can brush the tips of your wc pencils to get a limited amount of color for light washes. But this time I held two, an Antique White and Tangerine. I brushed the Tangerine then the White to make an opaque wash of orange. I used this very nicely on his eye as it had gotten a bit dark. Then I used the white alone to dab repeatedly to make a highlight on his eye. Besides the Chinese brush, I used the one small brush to do all of the painting on both, a round, cheapo brush from Walmart!
I hope you enjoyed my painting today as much as I enjoyed doing it! Please leave me your comments if you like and you can sign up to receive email announcements when I do a new post!

Thursday, January 17, 2008

Iris Watercolor Painting #1 1-17-08

I decided to put that little travel watercolor palette to test today. I picked up a gorgeous iris and lily yesterday, sketched it out and started the first stages of painting. My objective here was really to test out the palette, watercup arrangement and holding the light board all in one hand. I want to see if I can use it like this in the field without an easel for little studies. You can click on any picture to see enlarged views.

I show a close up of the arrangement so you can see the watercups; they are actually for holding mediums for oil painting, designed to hold the liquid even when tipped slightly on a hand held palette. They worked fantastic! I had to get over the habit of looking for my watercup on the table! You can see the 'sticky tack' or 'blue tack' in my palette. Yesterdays blog explained that better, so they get tested today and it worked wonderfully! Yay..two experiments that worked.
My hand got a bit tired from holding the board and palette but this set up is supposed to be for quick studies, I worked on it longer than I would in the field.
The pictures are to show the stages of my painting, start to finish.