peregrine+wc.jpg) This is a watercolor study I did to as a demonstration for my fall Nature Sketching and Painting Indoor class that just finished up. I used it to show the stages it took to make a simple study, step by step, layering washes, values etc. Posted below are the steps it took to make this 5"x5" study head, be sure to click on pictures to see larger views! Enjoy!
This is a watercolor study I did to as a demonstration for my fall Nature Sketching and Painting Indoor class that just finished up. I used it to show the stages it took to make a simple study, step by step, layering washes, values etc. Posted below are the steps it took to make this 5"x5" study head, be sure to click on pictures to see larger views! Enjoy!
Detailed sketch - Shown below, first I started with a light gesture sketch of the shape of the bird, then rechecked placements of things and refined details.
 Darkest Darks-This is one approach to watercolors, start by laying in your darkest darks and blacks. If you start with a confident sketch it should work out fine, when you work this way you set out from the beginning with a defined dark end of the value range. You can then judge all other values against it as you paint. You won't have to go back and keep "pushing" your darks to make them pop.
I also painted the eye, being carful not to touch the highlight area, black for the pupil, and brown put into the wet black for the iris. (I think I put my reading glasses on for this step! haha).

Below I started to lay in more darks of the cheek, as my brush was drying out I would 'sketch' areas I wasn't sure about...just to start to lay in some value so I could see where I wanted to paint.
 Color Wash-Here I laid in a bluish grey, ultramarine and black thinned with water. After it dried I laid in some small lines for feathers.
 Changeing the drawing- A pale yellow ochre wash on skin of eye area and nares. A wash over the eye highlight to tone it down and soften it. Here I also made a decision about the beak, now that I was putting values down, I thought the beak looked a bit too heavy. So before committing to paint, I erased! I reworked the curve then I painted keeping all areas soft and blended slightly.
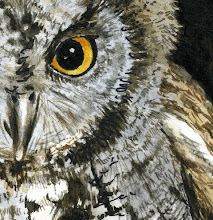
 Feather details-I brushed on more feather details here, laid in more darks with repeated 'feather' strokes to top of head and all around eye. Nice spotty look at right edge, I like when the watercolor can been seen for what it is, it gives it a looseness. See the photo below for this step, just repeated tiny strokes.
 Yellow of beak and eye-Here I laid in the yellow on the nares and eye area, and it's completed!
 peregrine+wc.jpg) Please visit my shop to see it on many items, including prints, glossy note cards, t-shirts, sweatshirts, hoodies, ceramic tiles, postage stamps, mugs...there's so much! You'll also see my other birds of prey paintings there! http://www.zazzle.com/marymcandrew/gifts?cg=196549703362479635
Please visit my shop to see it on many items, including prints, glossy note cards, t-shirts, sweatshirts, hoodies, ceramic tiles, postage stamps, mugs...there's so much! You'll also see my other birds of prey paintings there! http://www.zazzle.com/marymcandrew/gifts?cg=196549703362479635
To visit the home page of my shop: http://www.zazzle.com/marymcandrew?rf=238697367961899770


10 comments:
Very nice, Mary.
I'm going to try doing a painting starting with the darks first. I do have that problem of not being able to get my darks dark enough when the painting is done.
Keep up the great work! More step-by-step, LOL!
Hi April,
Something else to consider when working this way, darkest darks first, if you use permanent ink for your blacks...you can do all washes and painting over it without worry of disturbing the black. Sometimes I do this, but I didn't on this painting, I knew I could keep away from my blacks pretty easily.
thanks for the comments!
Mary
That hawk's steely gaze appears transfixed on it's prey
Yes, it's all about the eyes isn't it? I love painting eyes in portraits or birds and animals, it's when they seem to look back at you that you know you've captured them on paper!
It makes them come alive, I love this moment!
I totally agree with the eyes comment! Makes or breaks a painting. I've been doing some dog portraits lately and I don't continue much detail until those eyes look just right. :)
Love the falcon, by the way. And I like that you started with the darkest darks. That is the method that Margaret Saul uses in her botanicals (I took some of her classes) and it can be difficult to master, but can be more lively than many, lighter washes.
Hi Carol and thanks for the comment,
Most students I teach are surprised to learn there's a different approach to watercolors they can try! They were taught to always start with light washes and work their way up...and they said their teachers would have a fit if they did it any other way!! hahaha....I'm serious! I will use all different approaches, it depends on what I'm trying to do, I think if you are flexible and experiment with many techniques, you have so much more to 'draw' upon!
I liken this darkest darks approach to what I learned in classical drawing, we always laid in our darkest darks first.
Keep painting!
Hi Mary,
I love the step-by-step; you make it look so easy!
Looking forward to reading more about your trip to England.
Thanks fieldsketching,
well...easy...it seems like it when you look at all these neat step by steps after, but I had to take each step one at a time, and it really wasn't that hard! Good drawing skills are the most important thing.
(and a steady hand).
I'll be adding to the England trip story soon...
thanks again!
Mary
is your painting for sale?
Hi Sara, the original isn't for sale because it's in the middle of my nature sketchbook! BUT here's a link to my shop that shows the image on many items (along with other birds of prey I painted).
http://www.zazzle.com/marymcandrew/gifts?cg=196549703362479635
If you would like it on any item Zazzle makes, let me know and I'll create one. There is a print of it there, with text at the bottom, but you can remove it or write what you want.
Thanks so much for your interest!
Post a Comment